Data administration
1. Create a Data Connection
A data connection is a link to a repository or database (Postgres, MSSQL, BigQuery, S3, Databricks…). Data connection can be created from the Data connection tab. The list of all connectors available:
PostreSQL
MySQL
SQL Server
BigQuery
RedShift
Synapse
Azure SQL
GCS
S3
Azure Blob Storage
Databricks
MongoDB
Can’t find your connector? Contact your Sarus representative so that we add it for you.
2. Create a Privacy Policy
Privacy Policies define the types of outputs users will be able to extract from a dataset. It is a powerful way to adjust output privacy irrespective of the fields that are present in the input data. The outputs can be (i) derived from synthetic data only, (ii) computed with Differential-Privacy on the real data, or (iii) the result of a whitelisted operation (ie computed on the real data without any protection). For a deeper understanding of the outputs types possibilities, check Understand outputs.
3. Create a Dataset
The dataset is a central object in Sarus. It links to a data source.
Note that adding a dataset doesn’t mean moving or copying data. In most cases, the application will either use the external resources (eg: SQL, BigQuery, Databricks) to process the data in their original environment. The main exception is csv files, whether uploaded or stored in a cloud repository.
To add a dataset so it can be used for privacy-safe analytics and AI:
Click “+ Add” in the Datasets section. Fill in your dataset info and select a data source. There are two options:
Use a data connection: Select an existing connection or create a new one.
For file-based storage connections (S3, GCS..), input the URI of your data source file. For now, Sarus only supports adding a single CSV file.
For SQL-like sources, browse and select one or more source table(s).
Upload file: Drop or browse your CSV file. This will upload the data onto your Sarus instance and keep a copy of it.
NB: CSV onboarding can lead to errors due to inference. If you have an error, please contact your Sarus representative.
Click “Next” to check the data source and detect the schema (i.e.: type of each column, relationships between tables).
Once the schema is detected, there will be several sections that are customizable:
Relationships: this section defines the relationships (Primary Key / Foreign Key) between the different tables of the dataset. The relationships will be preserved in the synthetic data.
If primary/foreign keys were defined in the original data, they will be automatically detected. You can edit the retrieved information if need be and/or add primary and foreign keys. You can also define shared-id-spaces, which are ids living in the same space but without any foreign keys
NB: The application will not verify manually edited relationships. It will not verify the unicity of a primary key or the existence of a corresponding key (and its unicity) in the case of foreign keys. This can lead to errors afterward, so the relationships must be specified cautiously.
Protection keys: this section allows you to define a list of keys to protect in each table. A privacy key can be:
A specific column in any table
The index of any table (called rowId in the UI)
When a table has a foreign key pointing towards a privacy key defined in another column, it will be automatically protected. It will appear as “Linked”. Depending on how privacy keys are defined, each table will be either:
Protected: a table for which a privacy key has been selected manually (a column or the rowId)
Linked: a table which inherits the protection keys because it has a foreign key to another table that is protected (possibly recursively)
Public: tables that do not contain any privacy key. It can be by definition or the Data Preparator can decide to remove the privacy key of a linked table to make it public. A public table is not protected at all, the SD are exactly equal to the original data. A public table is not protected at all, the SD are exactly equal to the original data. So, a public table must not contain any sensitive data.
The schema below shows an example of privacy key propagation.
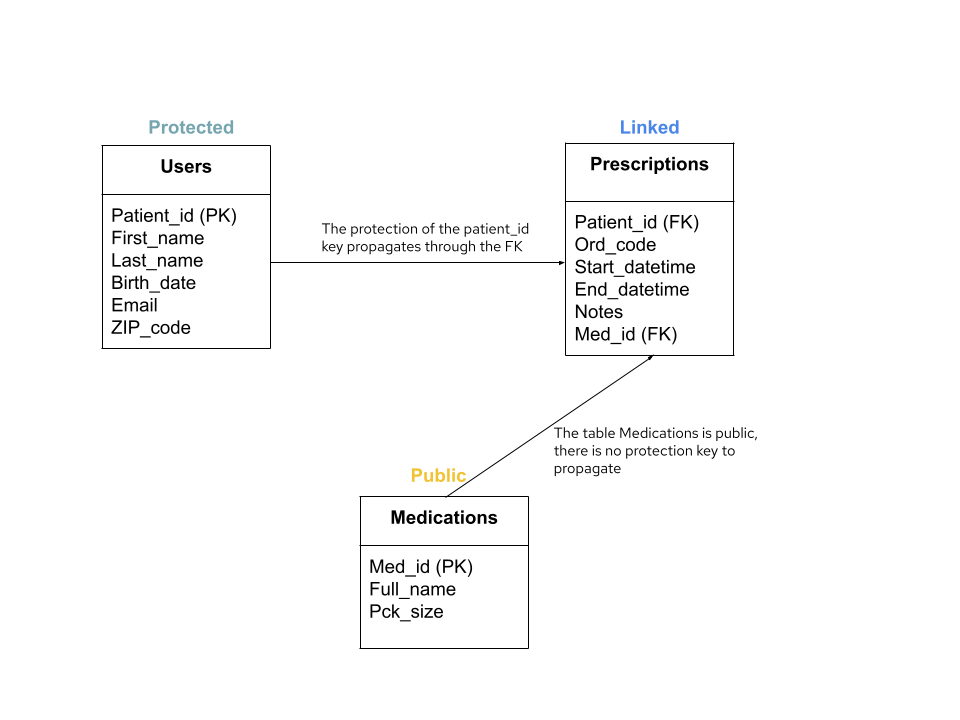
In this example, the table Users has a privacy key (Patient_id) and the table Prescriptions has a foreign key pointing to this column. Therefore, the table Prescriptions becomes a Linked table and the privacy key of this table will be over the column Patient_id. The table Medications is public because there is no privacy key in this table and no foreign key pointing to another privacy key, so for this table the synthetic data will be identical to the original data.
Advanced column settings: this section allows the data administrator to refine the schema. The refined schema will impact how synthetic data is generated for each column and how differentially-private results are computed.
For each column, the data administrator can choose between:
Possible values: if a column is defined with possible values, the synthetic data of this column will be taken from this finite list of values. Note that this can be a privacy risk if some values reveal the presence of one individual
Other: For numeric types (integer, float, datetime), the synthetic data values will be any value within a range. For text, a trigram model or a LLM will generate free text using the detected charset of the original column and an estimation of the distribution of lengths.
After validation of the schema, the data administrator will be able to choose between two methods to generate the synthetic data:
Accuracy: this method will use a deep learning model to generate more faithful synthetic data (for example, correlations between columns will be preserved).
Speed: this method will generate all the columns independently, following the distribution of each column. Therefore, correlations between columns are not preserved, but the generation process is faster.
Big data dataset
If the size of a dataset in bytes is greater than the BIGDATA_THRESHOLD (see value in the UI, Settings > Big Data Threshold in bytes); can be adjusted during the installation), the dataset will be considered a “big data dataset”. This implies the following:
BIGDATA_THRESHOLD rows of synthetic data will be generated, which will effectively be smaller than the original dataset.
Pandas transformations will be executed against an extract of the original dataset of size BIGDATA_THRESHOLD. So the results might be impacted.
4. Allow an analyst to query the dataset
Once the synthetic data is generated, the dataset is Ready. By default, only the user who onboarded the dataset has access to it. The access rules tab allows the data preparator to authorize other users to query the dataset by defining Access Rules.
To define an access rule:
Select a user or a group of users to grant a query access to
Select the appropriate privacy policy (learn more about privacy policies)
Click “Add Rule”
The user/group of users can now query the dataset with the Python SDK or a BI tool.